.svg)
PIR vs microwave sensors, zoning, dimming strategies, and commissioning to cut warehouse lighting energy up to 68% and meet code.


Warehouse motion sensors can cut lighting energy use by about 68% in some modeled cases, and they may be needed to meet code.
If I were sizing up this upgrade, I’d focus on four things right away:
A few setup details make the whole thing work:
A simple comparison helps:
| Sensor type | Best use | Main limit |
|---|---|---|
| PIR | Lower-clearance rooms with a clear view | Racks can block detection |
| Microwave | High-bay aisles and open warehouse areas | Needs careful setup to avoid extra detection |
There’s also a cost angle. One modeled 100-fixture example dropped annual lighting cost from $21,024 to $6,658. And with rebates, simple payback may land around 17 months.
So if you want lower power use, fewer lights running with no one there, and a setup that lines up with code, motion sensors are often a strong fit for warehouse lighting.
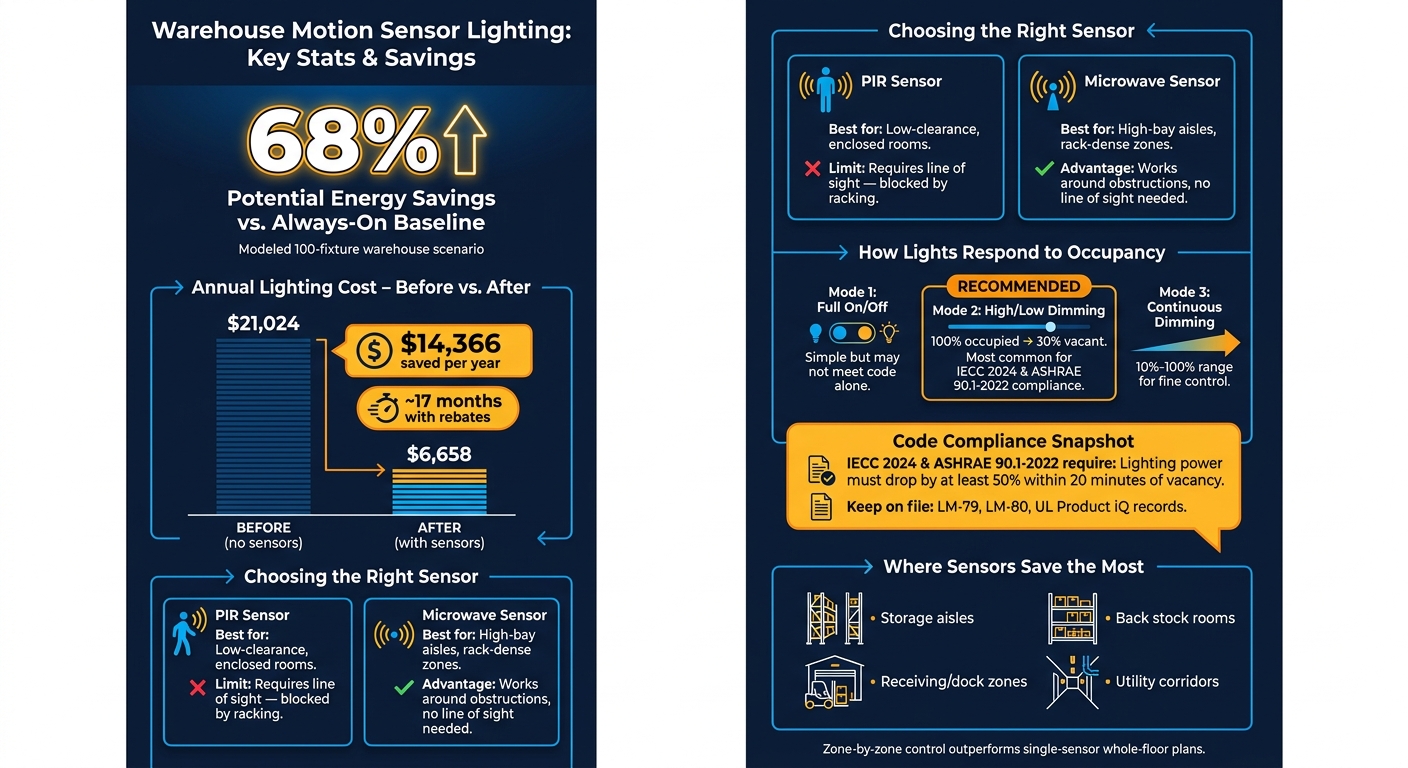
Warehouse Motion Sensor Lighting: Key Stats & Savings at a Glance
A warehouse motion sensor tracks occupancy and sends a control signal to the LED driver. When someone walks into the area, the driver brings the lights up. When the space stays empty past a set timeout, it dims the lights or turns them off.
Most setups use 0-10V dimming. In plain English, the sensor adjusts the voltage signal going to the LED driver. A 10V signal usually means full light output, while 1V usually means the lowest dimmed level, often about 10% of full power.
PIR and microwave sensors both detect motion, but they do it in different ways. In a warehouse, that difference matters.
Passive infrared (PIR) sensors pick up changes in heat when a person moves across their field of view. They work well in smaller enclosed spaces or low-clearance areas. The catch is simple: they need line of sight. If racking blocks the view, you can end up with dead zones.
Microwave sensors send out low-power pulses and read the reflections from moving objects. Since they don't depend on line of sight, they can detect motion around racking and through thin partitions. That makes them a better match for high-bay aisles and large warehouse spaces.
| Feature | PIR | Microwave |
|---|---|---|
| Detection method | Heat movement | Reflected microwave pulses |
| Line of sight required | Yes - blocked by racks | No - works around obstructions |
| Best application | Low-clearance, enclosed areas | High-bay aisles and large open spaces |
Always check that the sensor's rated mounting height fits your actual warehouse ceiling before you order.
After the sensor picks up motion, the next step is the lighting response. When motion is detected, the lights go to full output. After a set period with no activity, the control logic steps in. From there, the system usually follows one of these paths:
For most warehouses, high/low dimming is the practical option. Dropping to 30% leaves enough light for quick checks and helps cut wear from repeated full switching.
Zoning pushes this idea further. Instead of treating the whole warehouse floor as one lighting zone, independent aisle control lets each row or section react to its own sensor. That's handy in aisles that fill up and empty out at different times. One occupied aisle can run at full power while nearby empty aisles stay dimmed. And if needed, multiple fixtures can share one sensor through linked 0-10V control wiring.
Those setup choices shape the energy savings and maintenance gains that matter in day-to-day warehouse work.
Once the control logic is in place, the payoff tends to show up in four main areas.
Motion sensors bring four clear gains: lower energy use, less maintenance, better visibility, and automatic zone control.
| Category | Benefit |
|---|---|
| Energy Savings | Cuts vacancy power by at least 50%; modeled total savings reach 68% |
| Maintenance Impact | Lower runtime reduces driver wear; fewer lift rentals and less relamping at high-bay fixtures |
| Safety & Visibility | Maintains usable minimum visibility during vacancy instead of going dark |
| Operational Control | Automates zone-by-zone lighting response |
The biggest savings usually come from low-traffic areas. That’s where zone-based control starts to pay off.
Storage aisles, back stock rooms, receiving zones, and utility corridors often sit empty for long periods. Without sensors, lights in those spaces can stay on far longer than needed .
A modeled 100-fixture warehouse example shows how big the difference can be. With dimming and occupancy controls in place, annual energy costs fell from $21,024 to $6,658. Using a schedule of 4 hours at full power, 12 hours dimmed to 30%, and 8 hours off, the modeled energy drop came to about 68% compared to an always-on setup.
That kind of reduction can also help on the cost side up front. Rebates may cut the initial spend and bring simple payback down to about 17 months .
Every hour a fixture runs at full output adds heat and electrical strain to the LED driver. Cut runtime, and you cut that stress too. Over time, that helps extend the fixture’s working life and can lead to fewer lift rentals and less relamping for high-bay fixtures.
There’s also the code side of the equation. ASHRAE 90.1 requires warehouse lighting to automatically reduce power by at least 50% within 20 minutes after an area becomes unoccupied. In practice, that usually comes down to a sensor layout that’s set up correctly, then commissioned and documented the right way.
For code review, keep LM-79, LM-80, and UL Product iQ records on file.
Those gains depend on sensor placement and timeout settings, which the next section covers.
Those savings only show up when the sensor fits the space. Sensor choice affects coverage, energy use, and code compliance. In most warehouses, the two biggest factors are ceiling height and rack layout.
Use PIR in clear, low-clearance rooms. Use microwave in high-bay aisles and rack-dense zones. That simple split does a lot of the heavy lifting.
Traffic patterns matter too. Low-traffic storage aisles can usually handle longer timeout settings. Busier dock areas need shorter delays so lights don’t stay on longer than needed. It also helps to map sensor zones directly from the lighting plan, especially near aisle ends where coverage gaps can sneak in.
For most warehouses, the most practical approach is a high/low dimming strategy. Set the occupied level, vacant level, and timeout based on how each zone is used in day-to-day work.
Timeout settings also need to stay in line with code. Most energy codes require a power reduction of at least 50% within 20 minutes of vacancy. Where skylights or windows bring in daylight, program daylight dimming to cut electric lighting when it isn’t needed.
Once the sensor type, zones, and timeout are set, the next step is mounting, wiring, and commissioning.
Once you’ve picked the sensor type and set the control logic, the next part is where the system either does its job or falls short. Installation and commissioning matter just as much as sensor choice. If a sensor is set up wrong, it won’t perform the way you expect.
Start by checking fixture model numbers against the submittal package and the DLC QPL.
When mounting sensors, place them carefully so racking doesn’t create dead zones.
For 0-10V systems, wire the line, neutral, and control leads based on the fixture and sensor diagram. Also keep Class 1 and Class 2 circuits separate.
Once wiring is done, program the timeout and dimming levels for each zone. Set occupied and vacant light levels to fit how that zone is used.
Next, test each zone under actual warehouse conditions. Put the sensors into test mode so the delay is shorter, then walk-test the space to make sure lights trigger the right way in every aisle and return to the programmed low state after the delay.
Your final checks should confirm two things:
Document the final setpoints, zone maps, and verification results for closeout.
After installation and commissioning, the last thing to check is fit. Motion sensors do their best work when the sensor type, placement, control logic, and commissioning all line up with the space. Get one part wrong, and you end up with dead zones or lights burning when no one’s around.
Low-traffic areas tend to deliver the biggest savings. In modeled use, occupancy control cut energy use by about 68% compared with an always-on baseline.
A well-designed setup can also reduce maintenance by easing LED driver stress, cutting service calls, and reducing lift time for high-bay fixtures. That’s why the setup work above matters.
Match the sensor to the layout, tune the logic to actual traffic patterns, and commission the system carefully for steady long-term performance.
Yes. Motion sensors can work very well in high-bay warehouses when they're set up the right way. They can cut energy use by 30–40% by keeping lights on only when people or equipment are in the area.
In these spaces, setup matters a lot. Sensors should be mounted at the proper height, usually 8–20 feet, and matched to the building layout. In high-bay aisles, microwave sensors are often the better fit because they cover more area and aren't blocked by racking as easily as PIR sensors.
Choose based on your warehouse layout and traffic patterns. PIR sensors pick up heat movement and need a clear line of sight, so they’re a better fit for smaller, enclosed spaces without racking in the way.
Microwave sensors can detect motion without a direct view, which makes them a better choice for complex aisles and high-ceiling warehouse areas. Dual-technology sensors use both methods, which helps deliver more reliable activation and cuts down on false triggers.
Yes. Motion sensors are one of the main ways warehouses meet current energy code rules, including IECC and ASHRAE 90.1.
These standards call for automatic lighting controls that dim or switch off lights in empty areas. The goal is simple: if no one is there, the lights shouldn’t stay at full power.
Common code items often include:
That paperwork matters more than people think. If an inspector, utility program, or tax reviewer asks for proof, you need clear records that show what was installed, how it was set up, and how it performed during testing.


