.svg)
Practical checklist to extend LED fixture life: daily checks, quarterly cleaning, annual inspections, electrical tests, safety/LOTO, and performance monitoring.
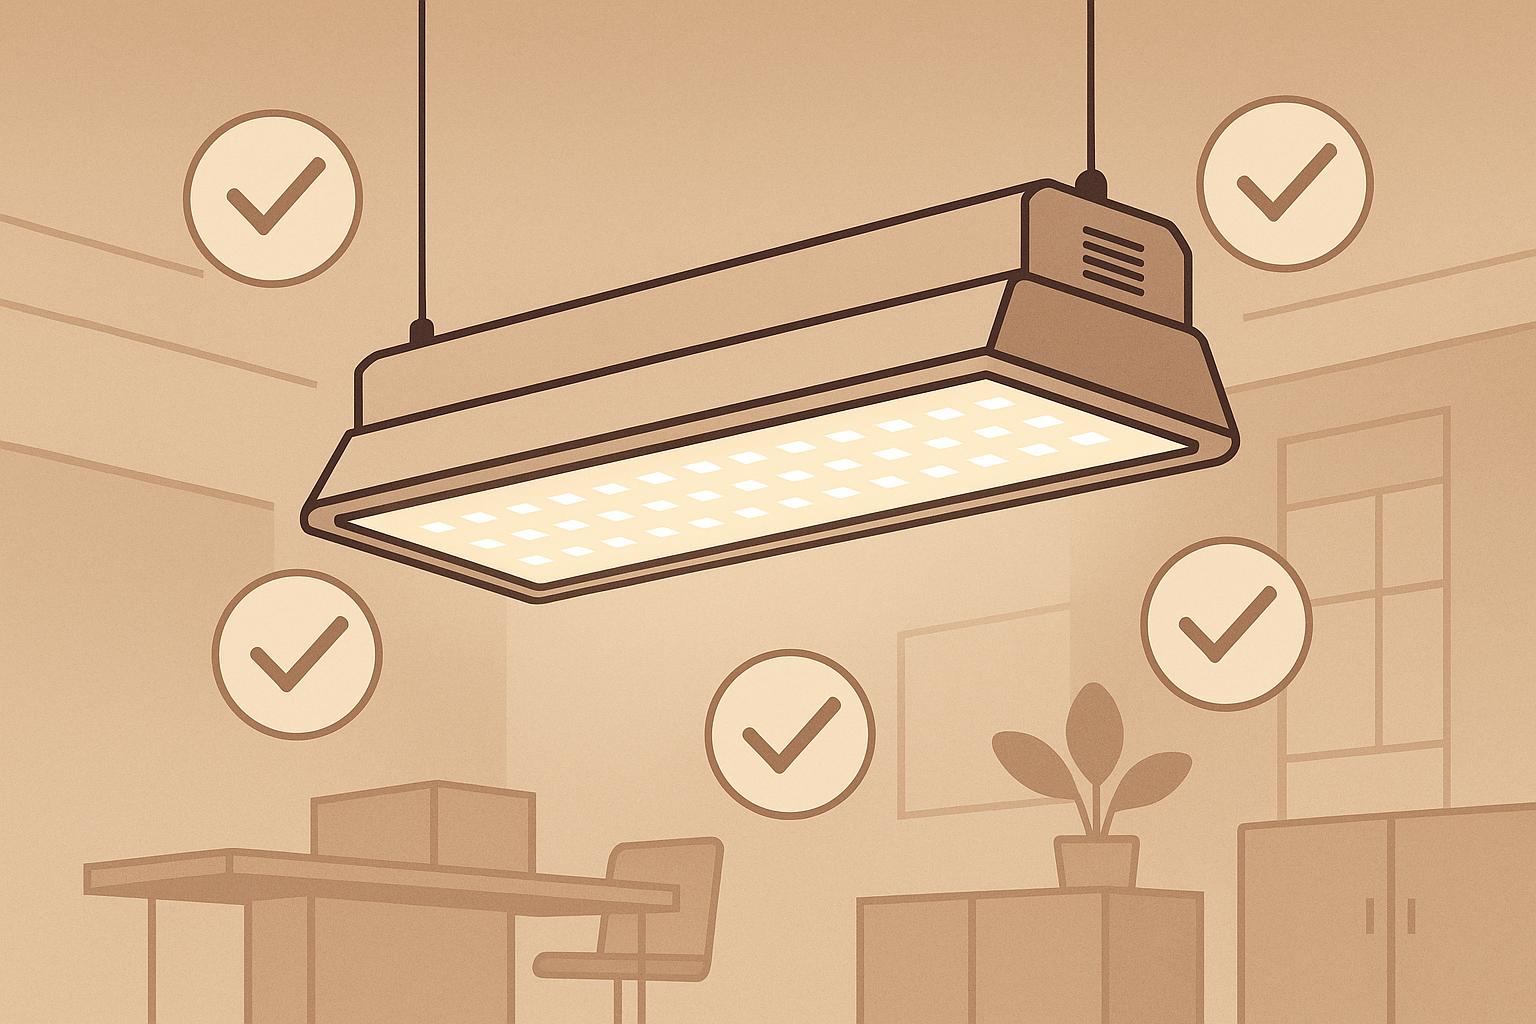
LED fixtures can last up to 100,000 hours, but factors like heat, dust, and poor maintenance can cut their lifespan short. Proper upkeep not only extends their life but also saves money, reduces energy use, and ensures compliance with energy codes like IECC 2021. Here’s how to keep your fixtures in top shape:
Electrical hazards in the U.S. pose serious risks, which is why following safety protocols isn't just a recommendation - it's a necessity. These measures not only protect workers but also ensure compliance with regulatory standards.
The Occupational Safety and Health Administration (OSHA) standard 1910.147 requires a formal lockout/tagout (LOTO) program to prevent accidental energization during maintenance tasks. Here's how it works:
Once the fixture is locked out, you can safely move on to preparing the necessary personal protective equipment (PPE) and tools.
OSHA standard 1910.132 mandates the use of specific PPE to ensure worker safety. For LED fixture maintenance, you'll need:
Additionally, essential tools include a CAT III 600V (or higher) multimeter, 1,000V-rated insulated screwdrivers, a torque wrench (10–50 in-lbs), and a reliable flashlight. For any tasks involving energized parts above 50V, wiring modifications, driver replacements, or fixtures over 277V, licensed electricians should take the lead. General maintenance staff, however, can handle de-energized cleaning and inspections - but only after LOTO procedures are completed. Once equipped with the proper protection and tools, document all fixture-related data to support compliance and maintenance efforts.
Accurate and detailed records are crucial for OSHA compliance, warranty claims, and meeting NEC Article 410 requirements. Key data to collect includes:
To streamline this process, consider using a CMMS app or an Excel template. These tools can help you scan QR codes on fixtures to auto-populate model and driver data, log LOTO steps with photos and timestamps, and track warranties using serial numbers. Pre-loading your system with photometric reports (IES files) can also establish benchmarks for future performance evaluations. Keeping thorough and organized records minimizes downtime during audits and lays the groundwork for efficient energy assessments in the future.
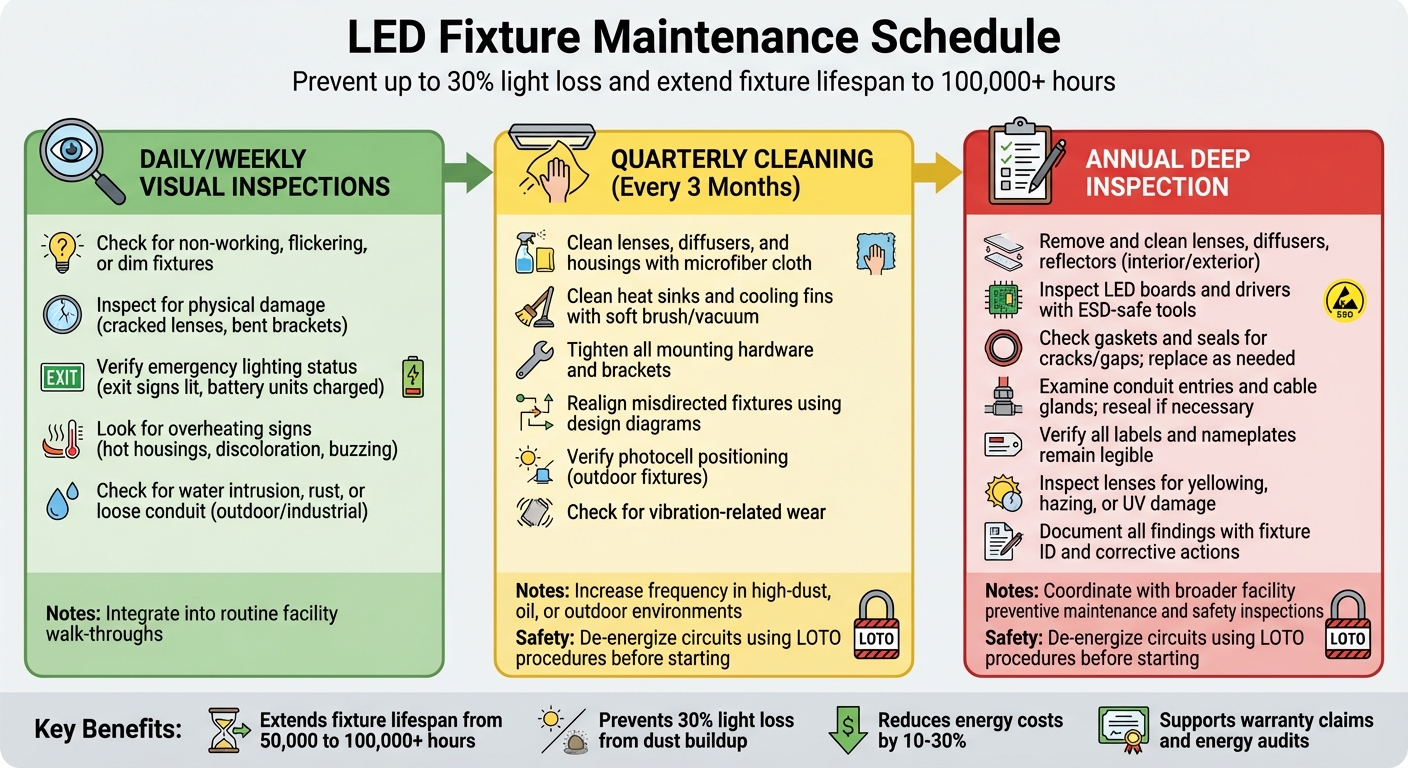
LED Fixture Maintenance Schedule: Daily, Quarterly, and Annual Inspection Checklist
Keeping a structured maintenance schedule can help prevent up to 30% of light loss due to dust buildup and ensure that LED fixtures reach their expected lifespan of 50,000+ hours.
The frequency of inspections should align with your specific environment. For example, a clean office requires far less attention compared to a busy warehouse with heavy equipment or an outdoor parking lot exposed to weather and insects. Many commercial facilities in the U.S. use a three-tier approach: regular visual checks during daily operations, quarterly hands-on cleanings, and an annual deep inspection of fixture internals.
During routine walk-throughs, staff should look for clear signs of issues that might impact safety or performance. This includes checking for non-working, flickering, or dim fixtures, as these could point to problems with the driver or LED board. Inspect for physical damage, such as cracked lenses, bent brackets, or sagging fixtures.
Emergency and exit lighting require special attention. Ensure exit signs are lit and confirm that battery units display a "charged" or "ready" signal. For self-testing emergency lights, check that status LEDs are active. Also, look for signs of overheating - like unusually hot housings, discoloration, or buzzing sounds from drivers. In outdoor or industrial settings, watch for water intrusion, rust, or loose conduit after severe weather.
Log all findings with details such as the fixture's location, the issue type, and the date. Any problems affecting safety or emergency systems should be flagged immediately for your maintenance team or a lighting specialist, such as Luminate Lighting Group.
After these daily checks, plan quarterly cleanings to address dust accumulation and ensure mechanical stability.
Every three months, schedule a hands-on cleaning session to restore light output and check fixture stability. Before starting, de-energize the circuits following LOTO (Lockout/Tagout) procedures. Use a microfiber cloth or antistatic duster to clean lenses, diffusers, and housings. For tougher grime, lightly dampen the cloth with water or a mild, non-ammonia detergent, avoiding abrasive materials or harsh chemicals that might damage protective coatings.
Heat sinks and cooling fins should be cleaned with a soft brush or vacuum to maintain airflow and prevent overheating. Inspect and tighten all mounting hardware, including brackets, aiming mechanisms, and safety cables, especially in high-bay or outdoor applications where vibration or weather might cause shifts.
Realign misdirected area, flood, or aisle lights using your original design or aiming diagrams to ensure proper light distribution. For outdoor fixtures, verify that photocell windows and shields are correctly positioned.
In environments with constant vibration - like warehouses with forklifts or manufacturing facilities - look for early signs of wear, such as hairline cracks around mounting points or frayed cables. If vibration is a recurring issue, consult a specialist like Luminate Lighting Group for upgraded mounting solutions.
For a deeper review, proceed to the annual cleaning and inspection.
Once a year, conduct a thorough cleaning and detailed inspection. This process helps identify fixtures nearing the end of their lifespan or those no longer suitable for their environment. De-energize circuits before starting. Remove lenses, diffusers, and reflectors to clean both their interior and exterior surfaces, clearing away dust, insect debris, and residue that can reduce light output.
Inspect internal components, such as LED boards and drivers, using dry, non-static brushes or an ESD-safe vacuum. Avoid liquids near sensitive electronics. Check gaskets and seals for cracks or gaps, replacing them as needed to maintain protection against moisture and dust, especially in outdoor or industrial settings.
Examine conduit entries and cable glands for tightness and signs of water damage or corrosion. Reseal them with the appropriate fittings if necessary. Confirm that all labels and nameplates (showing wattage, voltage, or emergency details) remain legible for compliance and future reference. Inspect lenses for yellowing, hazing, or UV damage, as these may reduce light output and signal the need for replacement.
Document all findings, including the date, fixture ID, observed issues, and corrective actions. This information supports maintenance planning, energy audits, and warranty claims. It can also guide decisions on replacements or LED retrofit projects for improved energy efficiency and lighting performance.
| Interval | Primary Tasks | Notes |
|---|---|---|
| Daily / Weekly | Check for non-working or flickering fixtures; inspect for physical damage and debris; verify emergency lighting status. | Integrate these checks into routine facility walk-throughs or safety rounds. |
| Quarterly (~3 mo.) | Clean lenses, housings, and heat sinks; tighten mounting hardware; realign fixtures; address early signs of seal or corrosion issues. | Increase frequency in areas with high dust, oil, or outdoor exposure. |
| Annual | Deep clean fixture internals; inspect lenses for discoloration; examine seals/gaskets; assess corrosion; update maintenance logs for energy audits. | Coordinate with broader facility preventive maintenance and safety inspections. |
Cleaning and visual inspections are important, but they only go so far. Electrical and component checks are essential for spotting failures that can disable fixtures entirely. For instance, LED drivers are the most common failure point in LED luminaires, even when the LED chips themselves are still functional. Loose wiring can lead to flickering or even fire hazards, while incompatible controls can waste energy and cause operational headaches. A well-organized electrical checklist can help prevent these problems and extend the life of your fixtures. These inspections, when paired with routine cleaning, ensure your fixtures perform at their best.
Start by inspecting all wiring for signs of wear, such as fraying, cuts, cracks, discoloration, or brittle insulation. Any compromised wires should be replaced immediately. Check wirenuts, terminal blocks, and ground connections by lightly pulling on the wires to confirm they’re secure - loose connections can cause power fluctuations or even fires.
Next, examine mounting brackets, screws, and gaskets for rust, corrosion, or mechanical fatigue, especially in areas exposed to the elements, heavy vibration, or industrial environments. Tighten any loose hardware and replace corroded fasteners with materials designed to resist corrosion. For outdoor fixtures, inspect cable glands, conduit entries, and seals for signs of wear or water damage. Document any damaged components to help identify patterns and plan for group replacements when necessary.
LED drivers are critical to fixture performance, so inspect them carefully. Look for discoloration, scorching, swelling, or leakage, which could indicate overheating or imminent failure. If you hear buzzing or humming, it could be a sign of electrical stress within the driver. Test the driver's temperature under load - anything over 140°F (60°C) is a red flag. If overheating is an issue, check for blocked vents or improper load conditions.
Ensure drivers in enclosed fixtures have at least 1–2 inches of clearance for proper cooling. Also, confirm that the driver’s voltage, wattage, and dimming type match the LED modules. Mismatched specifications can shorten the lifespan of the fixture by as much as 50%. For retrofits, cross-check manufacturer datasheets and consider installing surge protection in areas prone to power quality issues.
Test all dimmers, switches, occupancy sensors, and daylight sensors to ensure they’re functioning properly. Smooth, flicker-free dimming is a must, and many flicker issues stem from legacy dimmers designed for incandescent bulbs rather than LEDs. Replace these with LED-rated, trailing-edge dimmers. Also, test occupancy sensors and verify that timers and photocells are set to the correct schedules.
For emergency lighting and exit signs, compliance with NFPA 101 and NFPA 70 requires monthly 30-second function tests and annual 90-minute full-discharge tests. Keep detailed records of each test, noting the date, fixture ID, and technician initials. Check that batteries hold at least an 80% charge, lamps activate properly, and exit signs are fully visible. Batteries should be replaced every 3–5 years. Proper testing not only avoids fines but can also extend system life by up to 40%. Incorporate these tests into your broader safety inspections and document all results for compliance audits.
| Area Checked | What to Inspect | Typical Issues Found | Recommended Action |
|---|---|---|---|
| Wiring & Connections | Supply conductors, internal wiring, terminations, grounding | Loose wirenuts, frayed insulation, discoloration from heat | De-energize, tighten connections, replace damaged wires, verify grounding |
| LED Drivers | Housing, labels, wiring to modules and mains | Flicker, dimming, no light, buzzing, overheating/discoloration | Check ratings, improve ventilation, replace failing drivers, add surge protection |
| Heat Management | Heat sinks, vents, surrounding surfaces | Dust buildup, blocked airflow, hot spots | Clean, clear obstructions, verify ambient temperature within rating |
| Controls | Dimmers, switches, occupancy/daylight sensors, timers | Incompatible dimmers, nuisance on/off, wrong schedules | Use LED-rated controls, recalibrate sensors, correct schedules |
| Emergency Lighting | Emergency luminaires, exit signs, batteries, transfer circuits | Non-functional units, weak batteries, failed transfer | Perform code-based tests, replace batteries/fixtures, document results |
Tracking fixture serial numbers, driver models, failure dates, and repair actions can help pinpoint recurring issues and justify proactive replacements. These detailed checks not only support your maintenance strategy but also enhance energy performance. Plus, they provide valuable data for energy audits and can reveal opportunities for retrofits. For expert help with LED driver specifications, control integrations, or code-compliant emergency lighting designs, Luminate Lighting Group offers tailored audits and upgrade services for commercial and industrial spaces.
After conducting detailed electrical and component inspections, performance testing acts as the next layer of protection to ensure your LED fixtures remain efficient and reliable over time.
Regular performance testing helps verify light output and detect any gradual degradation. While electrical checks can uncover immediate problems, performance testing focuses on the long-term behavior of LEDs, as their light output can slowly diminish, and color consistency may shift with use. Without routine testing, these subtle declines might go unnoticed, potentially affecting visibility. A calibrated light meter, used at the appropriate task height (typically 30 inches for office settings), allows you to measure illuminance levels and compare them to your original design targets and industry standards. If readings show a decline of more than 20% from baseline or reveal uneven lighting, it’s time to clean, adjust, or replace the fixtures.
To measure light levels, use a calibrated light meter and record illuminance in footcandles at the work plane. Take readings in a grid pattern every 10 feet, then compare the results to your commissioning data and guidelines like those from IES RP-1 (which recommends 30–50 footcandles for offices and 20–50 footcandles for warehouses). If you notice uneven lighting - such as one area reading 40 footcandles while another measures only 15 - it could point to issues like dirty lenses, misaligned fixtures, or failing drivers.
Also, check for color temperature consistency. If some fixtures appear noticeably warmer or cooler than others, or if a shift of over 200K from the original 4000K color temperature is detected, this may indicate phosphor degradation, which often occurs after extended use (typically beyond 50,000 hours). Additionally, inspect for glare. If contrast ratios on task surfaces exceed 3:1 or veiling reflections account for more than 30% of overall luminance, consider adjusting fixture angles or adding shielding. Be sure to document every reading, noting the fixture ID, date, and technician’s initials, to track performance trends over time.
Detailed fixture records can help you plan replacements before performance drops significantly. Most commercial LEDs are rated for 50,000 to 100,000 hours at L70 (the point at which light output falls to 70% of its original level). For example, if your high-bay LEDs are rated for 50,000 hours, scheduling replacements at 35,000 to 40,000 hours is a good practice. Data loggers can help track cumulative burn hours for accuracy.
Review maintenance logs to identify recurring problems. If an area experiences frequent driver failures (more than 5% per year), overheating, or repair costs nearing 20% of replacement expenses, it may be more cost-effective to do a full retrofit rather than continuing with spot repairs. Coordinate major replacements with operational schedules to minimize disruptions - for instance, replacing high-bay fixtures during a plant shutdown or office fixtures over a weekend. Proactive replacements based on accurate data ensure consistent performance and reduce unexpected outages.
Maintenance records can also play a crucial role in energy audits and retrofit planning. By tracking repair frequency, component failures, and power consumption, you can identify inefficiencies. If more than 15% of fixtures underperform or energy use rises by 10%, it’s time for a comprehensive audit. Simply maintaining clean optics can save many facilities 10–20% on energy costs.
To evaluate return on investment (ROI), compare the current efficacy of your fixtures (in lumens per watt) to modern LED options. Upgrading to newer fixtures often improves ROI and shortens payback periods.
Luminate Lighting Group offers a great example of how data can drive efficiency. They use maintenance and energy records to design LED retrofits that achieve 30–50% energy reductions in warehouses, offices, and industrial spaces. Their energy audits combine historical performance data with photometric modeling to identify cost-effective upgrades. They also assist with documenting savings to qualify for utility rebates and 179D tax deductions. By turning routine data into actionable strategies, this approach ensures longer fixture life and better energy efficiency while aligning with broader operational goals.
Effective maintenance is the backbone of keeping LED fixtures performing at their best. By sticking to a structured routine - daily checks, quarterly cleanings, and annual deep inspections - you can extend the lifespan of your LED fixtures from 50,000 hours to over 100,000 hours. Plus, these practices can slash energy costs by 10–30%. Regular cleaning alone can prevent up to 30% light loss caused by dust buildup and help avoid heat-related failures. And don’t forget safety: procedures like lockout/tagout not only protect your team but also shield your equipment from potential damage, minimizing downtime.
Performance tests are another essential tool. Using calibrated meters and tracking drivers can help identify early signs of dimming or uneven lighting, which, if left unchecked, can increase energy consumption by 15–25%. Facilities that implement quarterly cleaning and driver monitoring often see fixture lifespans increase by 40% and replacement costs drop by 25%.
Keeping detailed maintenance records is just as important. These records are key for conducting energy audits and planning retrofits. By documenting repair histories and power usage, you can pinpoint inefficiencies and even support rebate claims or 179D tax deductions. Many facilities have achieved energy reductions of 50–80% by upgrading to LED systems based on these insights. This maintenance checklist not only ensures smooth daily, quarterly, and annual operations but also lays the groundwork for strategic energy planning.
Luminate Lighting Group takes maintenance data a step further, turning it into actionable energy strategies. Their audits combine your performance records with photometric modeling to create tailored retrofit plans that maximize efficiency. They also handle rebate documentation, ensuring your systems deliver long-term value.
"After installation, we test all lighting systems, provide warranty information, and remain available for maintenance guidance. We're committed to long-term performance and energy savings for your business." - Luminate Lighting Group
To keep LED fixtures in good condition and extend their lifespan, here are some practical steps to follow:
Always follow local electrical codes and the manufacturer's guidelines during maintenance to ensure safety and proper operation.
To keep track of fixture maintenance effectively, begin by setting up an organized system for recording all activities. Make sure to log every inspection, cleaning, repair, or replacement, along with details like dates, descriptions, and any notes from the technician.
Leveraging digital tools or maintenance management software can make this process smoother, ensuring records are both accurate and easy to retrieve. Consistently updating these logs not only helps monitor performance but also confirms compliance with safety regulations and simplifies audit preparation. Detailed documentation is also invaluable for planning future maintenance and proving adherence to regulatory standards.
If your LED fixtures are showing reduced brightness, flickering, or shifts in color, it might be time to consider a replacement or upgrade. These changes can impact the quality of your lighting and may indicate that the fixtures are no longer performing as they should.
Other warning signs include frequent failures or a noticeable uptick in energy usage. Upgrading can also be a smart move if your current fixtures fall short of today's energy efficiency standards or fail to meet updated code requirements. Switching to newer technology could lower energy costs and enhance performance.


