.svg)
Step-by-step guidance to cut office lighting energy by up to 75%—LEDs, audits, daylighting, smart controls, and code incentives.
Office lighting upgrades can cut energy use by up to 75% while improving productivity and meeting stricter regulations. Here's how you can achieve this:
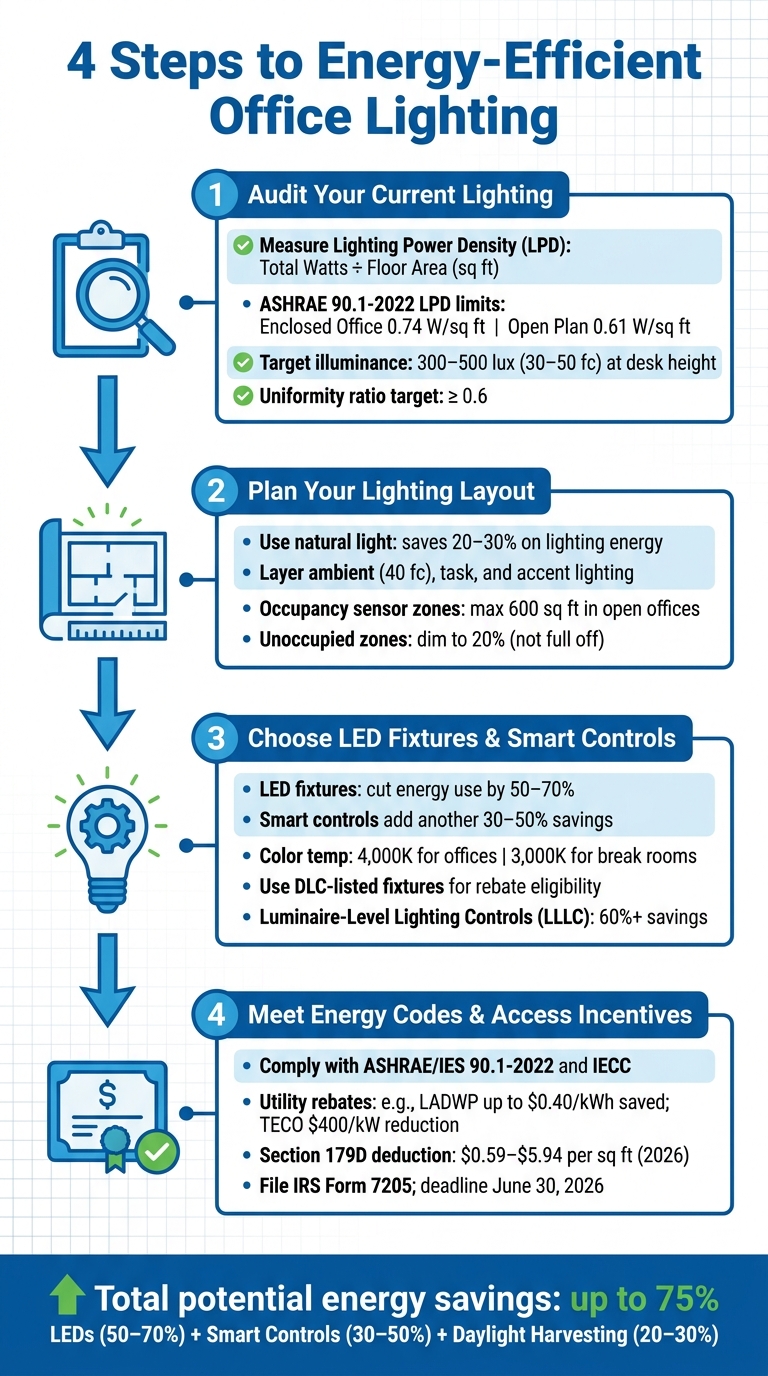
4-Step Guide to Energy-Efficient Office Lighting
To create an effective lighting plan, start with a detailed evaluation of your current setup. This helps pinpoint areas where energy is being wasted, lighting quality is lacking, or physical and electrical constraints might limit your options. A thorough review now will make the next steps in designing your lighting layout much smoother.
Begin with a walkthrough of your office. Take note of every fixture: what type it is (LED, fluorescent, or halogen), its wattage, and how it's controlled. Pay special attention to your Lighting Power Density (LPD). To calculate this, divide the total wattage of all fixtures (including drivers and ballasts) by the floor area in square feet. This gives you a "watt budget" to compare against energy code limits. For instance, under ASHRAE 90.1-2022, enclosed offices must stay within 0.74 W/sq ft, while open-plan setups have a stricter limit of 0.61 W/sq ft.
Next, use a lux meter to measure light levels at about 2.5 feet above the floor. According to IES guidelines, general office tasks like reading or typing require 300–500 lux (30–50 footcandles). Also, assess your uniformity ratio by dividing the minimum measured illuminance by the average. A ratio below 0.6 can indicate uneven lighting, which may lead to eye strain.
"LPD is a budget, not a target. If the IES foot-candle target for the space can be met with fewer watts per square foot than the LPD limit allows, use fewer watts." - Jarvis Staff
Use the data from your audit to customize lighting for different areas of your office. Each zone has unique lighting requirements. For instance, a private office, an open workspace, a conference room, and a hallway all need varying levels of brightness and have different LPD limits. Planning for these differences early helps avoid over-lighting (wasting energy) or under-lighting (reducing productivity).
| Space Type | Recommended Illuminance | ASHRAE 90.1-2022 LPD Limit |
|---|---|---|
| Enclosed Office | 300–500 lux (30–50 fc) | 0.74 W/sq ft |
| Office, Open Plan | 300–500 lux (30–50 fc) | 0.61 W/sq ft |
| Conference / Meeting Room | 300–500 lux (30–50 fc) | 0.97 W/sq ft |
| Corridor / Transition | 50–200 lux (5–20 fc) | 0.41 W/sq ft |
| Restroom | 200–300 lux | 0.62 W/sq ft |
Your building's layout and infrastructure play a big role in determining what’s possible. For example, ceiling height and type influence fixture mounting. A dropped tile ceiling, an exposed concrete deck, or a drywall ceiling each require different approaches. Higher ceilings may also need fixtures with stronger output to properly illuminate work surfaces.
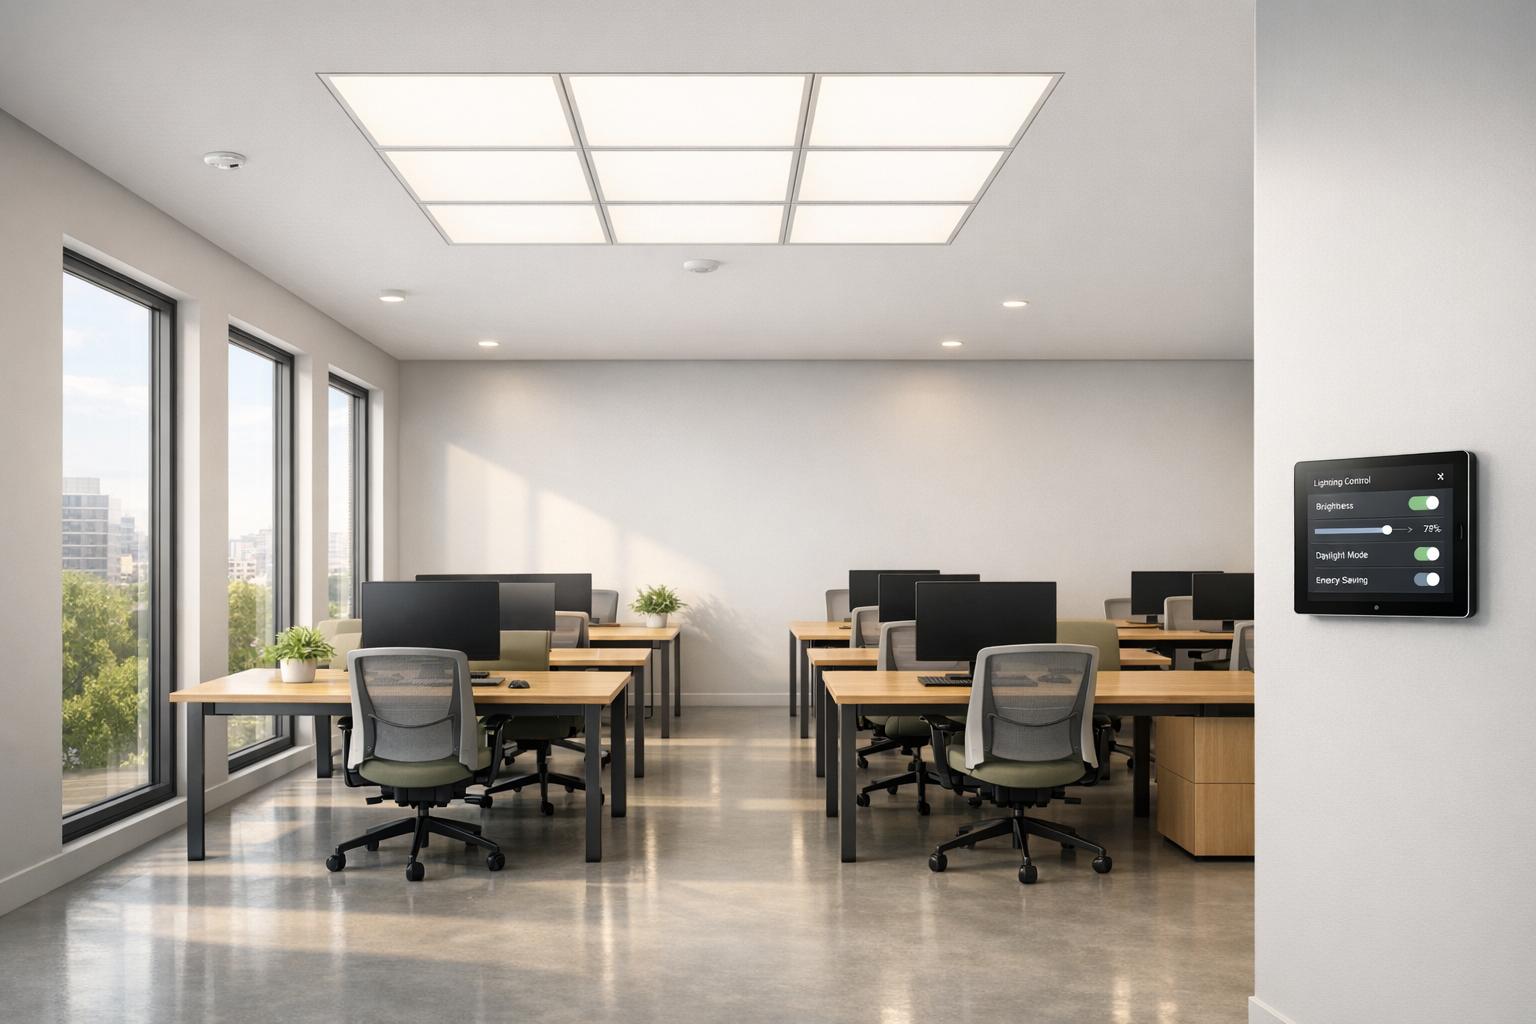
On the electrical side, check if fixtures near windows share circuits with interior lights. If they do, you won’t be able to dim window-adjacent zones separately unless you rewire or use Networked Lighting Controls (NLC). NLC systems allow you to define control zones through software, avoiding the need for new wiring. Additionally, identify any "primary sidelit areas" - spaces within a distance equal to the window head height from exterior windows. If the lighting in these zones totals 75W or more, energy codes often require daylight-responsive dimming controls. Addressing these constraints now can help you avoid expensive issues down the line.
Your audit data now serves as the foundation for designing an efficient and comfortable lighting layout. This step is all about turning those numbers into a plan that balances employee well-being, compliance with regulations, and energy savings.
Before diving into fixture selection, it’s important to define clear, measurable goals. Start by aiming to keep your Lighting Power Density (LPD) within the ASHRAE 90.1-2022 limits for each space type. At the same time, ensure your workspace achieves an illuminance level of 30–50 footcandles (fc) at desk height, which is ideal for standard tasks. Think of the LPD limit as your maximum threshold, and use the lumen method to calculate the lumens needed. If you can meet your footcandle targets while using less energy than the code allows, you’ll save on costs and create a more comfortable environment for employees.
Daylight is not only free - it can also cut lighting energy use by 20%–30% in spaces with good glazing. To make the most of natural light, group fixtures near windows (within one window-head-height from the glass) on separate circuits. This setup allows you to dim or turn off perimeter lights when daylight is sufficient.
Simple design choices can amplify daylight’s impact. For example, light-colored walls and open furniture layouts help reflect daylight deeper into the office, reducing reliance on artificial lighting. If your office has east- or west-facing windows, consider using exterior overhangs or interior shading devices. These can reduce glare from low sun angles without blocking useful light.
Once you’ve optimized daylight, focus on creating layered lighting to meet the varied needs of different office zones. Layering combines ambient, task, and accent lighting to ensure every area is appropriately lit.
Conference rooms often require flexible lighting. Plan for dimmable fixtures that can adjust from 50 fc for meetings to around 10 fc for presentations. Including multi-scene controls and dimming options in your initial design can help you avoid costly retrofits later.
In open offices larger than 300 square feet, keep occupancy sensor zones limited to 600 square feet. To avoid sudden dark patches, set adjacent unoccupied zones to operate at 20% power instead of switching off entirely. This approach saves energy while maintaining a visually comfortable environment.
Once you've nailed down an efficient layout, the next step is selecting the hardware that brings your lighting design to life. The right fixtures and controls not only meet code requirements but also enhance the overall functionality and efficiency of your lighting plan.
When evaluating fixtures, it’s important to understand two key measurements: lumens, which indicate total light output, and foot-candles, which measure how much light reaches the work surface. Foot-candles are critical for ensuring compliance with codes and achieving comfortable, effective lighting.
"The number that matters for code compliance, visual quality, and safety is foot-candles at the task plane - not lumens on the box." - Jarvis Staff
To figure out how many fixtures you’ll need, you can use the lumen method:
Fixtures = (Target fc × Area) ÷ (Lumens per fixture × CU × LLF)
Here’s what each term means:
Also, check for DLC qualification on fixtures to ensure you're eligible for energy rebates.
When choosing fixtures, consider the height of the ceiling, the tasks performed in the space, and the room’s purpose. Here’s a quick guide for common office applications:
| Application | Fixture Type | Lumens |
|---|---|---|
| Standard Office | 2×4 LED Troffer / Flat Panel | 4,000–6,500 lm |
| High Ceiling Office | LED Pendant / High Bay | 10,000–20,000 lm |
| Conference Room | Dimmable LED Troffer / Linear | 3,000–5,000 lm |
| Stairwell / Corridor | LED Wrap / Surface Mount | 2,000–4,000 lm |
Color temperature is another critical factor. Neutral white (around 4,000K) works well for general office areas because it boosts alertness without feeling overly harsh. In break rooms or informal spaces, a warmer tone (around 3,000K) creates a more relaxed vibe. For areas with heavy screen use, go for low-glare fixtures or indirect lighting that reflects off the ceiling - this reduces eye strain.
Once you’ve matched the right fixtures to each space, it’s time to integrate smart controls to maximize energy efficiency.
Switching to LED fixtures can cut energy use by 50–70%, but adding smart controls can take those savings even further - by an additional 30–50%.
Occupancy sensors are a must-have for reducing waste. According to ASHRAE 90.1-2022, lights must dim or turn off within 20 minutes of a space being vacated. In conference rooms, set sensors to vacancy mode (manual ON, auto OFF) to avoid unnecessary activation when rooms are scheduled but unused. For daylight harvesting, position perimeter fixtures along the actual daylight penetration line, typically 8–12 feet into the room, to ensure optimal energy savings.
Luminaire-Level Lighting Controls (LLLC) take efficiency to the next level by embedding occupancy and daylight sensors directly into each fixture. These controls simplify wiring, allow for easy rezoning via software, and can deliver energy savings of over 60%.
"Luminaire-Level Lighting Controls (LLLC) are changing how commercial buildings manage lighting, energy efficiency, and occupant comfort." - Kaitlyn Dambrosio, Lighting Controls Expert
Make sure to commission each fixture to meet precise foot-candle targets. LEDs often produce more light than needed, so running them at full power not only wastes energy but can also shorten the lifespan of the driver. If you're working with a provider like Luminate Lighting Group, fixture-level tuning is usually included in the commissioning process as part of a comprehensive lighting design and retrofit service.
Now that you've chosen your fixtures and controls, it's time to focus on meeting energy codes and tapping into financial incentives. Doing this right can lead to significant savings on your project.
In the U.S., office lighting is primarily governed by ASHRAE/IES Standard 90.1 and the International Energy Conservation Code (IECC). These standards often overlap, with the IECC accepting ASHRAE 90.1 as an alternative compliance option. Be sure to check with your local Authority Having Jurisdiction (AHJ) to confirm which version applies in your area - some still enforce the 2016 or 2019 editions instead of the latest 2022 version.
Under ASHRAE 90.1-2022, Lighting Power Density (LPD) limits vary depending on the type of space. These limits represent maximum wattage levels, but using less energy where possible is always a smart move.
| Space Type | LPD Limit (W/sq ft) | Key Control Requirements |
|---|---|---|
| Enclosed Office | 0.74 | Occupancy/vacancy sensor + local switch |
| Open Office | 0.61 | Sensors (max 600 sq ft zones) + local switch |
| Conference Room | 0.97 | Sensor + local switch + dimming |
| Corridor/Transition | 0.41 | Occupancy sensor (may reduce to 50% power) |
| Restroom | 0.62 | Occupancy or vacancy sensor (full shutoff) |
A useful strategy is to adopt the Space-by-Space Method for LPD calculations. Unlike the Building Area Method, this approach gives you more flexibility by allowing higher wattage in areas like conference rooms while balancing it with lower wattage in less demanding spaces like corridors.

Utility rebates and federal tax deductions, like Section 179D, can make a big dent in your overall project costs.
For utility rebates, check your provider's website for programs like "Commercial Lighting Incentive Program." Many of these programs require pre-approval before purchasing or installing equipment. For example:
To qualify, ensure your fixtures and controls appear on the DesignLights Consortium (DLC) Qualified Products List, as this is a common requirement.
The Section 179D deduction is a federal incentive designed for energy-efficient upgrades in commercial buildings. For 2026, the base deduction ranges from $0.59 to $1.19 per square foot, depending on how much energy savings exceed the ASHRAE baseline. Projects meeting Prevailing Wage and Apprenticeship (PWA) requirements can qualify for deductions as high as $5.94 per square foot. To claim this, you'll need certification from a licensed engineer and must file IRS Form 7205 for the tax year the system is installed. Keep in mind, this deduction only applies to projects started before June 30, 2026.
"The tax deduction amount ($/ft²) increases with greater improvements in energy efficiency." - Department of Energy
These incentives can add significant value to your energy-efficient design.
After finalizing your design and fixture selection, proper system commissioning is essential to ensure both performance and compliance with energy codes. This step is critical for avoiding delays and added costs.
Before inspection, double-check that all controls and override functions meet code requirements. For example, verify that manual overrides, 20-minute occupancy sensor shutdowns, and independent controls for daylit zones are functioning as intended.
For retrofits involving over 2,000 watts, full area LPD and control requirements must be met. While this might seem daunting, it can also open the door to higher-tier utility rebates, especially for features like occupancy sensing and daylight harvesting. Be sure to document everything - photos, invoices, and installation details - and submit them promptly through your utility's portal to secure rebates.
Failing to pass a lighting energy code inspection could delay your Certificate of Occupancy, causing project setbacks and extra labor costs. Partnering with experts like Luminate Lighting Group, who include commissioning and compliance verification in their process, can help you avoid surprises and keep everything on track.
Creating an energy-efficient office lighting system boils down to four key steps: audit your current system, plan a layered lighting layout, choose the right LED fixtures and controls, and ensure compliance with energy codes to access incentives. Each step builds on the one before it - your system audit guides the layout, the layout influences fixture and control choices, and those selections determine if your design meets Lighting Power Density (LPD) limits and qualifies for rebates.
By incorporating high-efficacy LEDs, you can slash energy usage by 50–70%. Add features like occupancy sensors, daylight harvesting, and scheduling, and you could see savings climb to as much as 75%. Using DLC-listed fixtures not only improves efficiency but also opens the door to utility rebates. Plus, a well-documented project may qualify for Section 179D tax benefits.
Energy codes aren’t just paperwork - they’re integral to the design. Requirements like LPD limits, sensor timeouts, and daylight controls should be treated as essential components. Overlooking these can lead to costly setbacks. As highlighted by Jarvis Staff:
"A lighting installation that fails the energy code inspection does not just delay the project. It means the contractor goes back to the site, pulls fixtures or adds controls that should have been in the original scope, and absorbs the labor cost." - Jarvis Staff
Lighting plays a critical role in workplace safety and productivity. The Occupational Safety and Health Administration (OSHA) sets the minimum standard at 30 foot-candles for safety, while the Illuminating Engineering Society of North America (IESNA) suggests 30–50 foot-candles for general areas and 500 lux (approximately 46 foot-candles) for workstations.
Issues like under-lighting often stem from poor layout or outdated fixtures, leading to eye strain and reduced efficiency. On the flip side, over-lighting can waste energy and create uncomfortable glare, which can also hinder productivity.
To ensure your office meets these standards, consider a professional lighting audit. This process measures current light levels, checks compliance with ASHRAE 90.1 energy standards, and identifies opportunities to fine-tune your lighting setup for better performance and efficiency.
Whether you need rewiring depends on how you plan to control your lighting. Zone-based systems might require either new physical wiring or wireless setups, both of which can drive up labor costs. On the other hand, Luminaire-Level Lighting Control (LLLC) systems come with built-in sensors in each fixture, making installation much easier. Luminate Lighting Group can assess your current system and suggest the most cost-effective option that meets energy codes and aligns with your sustainability objectives.
To claim utility rebates, you'll generally need a pre-approval package. This usually includes items like a lighting floor plan, a fixture schedule, manufacturer specification sheets, energy modeling documents (such as COMcheck), final invoices, and, in some cases, a certificate of occupancy.
For the 179D deduction, you'll need to file IRS Form 7205. Along with that, provide a 179D study, energy efficiency certification, and, if applicable, an allocation document. It's a good idea to consult a tax professional to ensure you're meeting all the requirements.


