.svg)
Five-step guide to auditing LED lighting for compliance, energy savings, and safety—covering objectives, tools, measurements, analysis, and action plans.
LED lighting compliance audits ensure your facility meets energy regulations, improves safety, and reduces costs. These audits help identify inefficiencies, optimize lighting systems, and qualify for tax credits or rebates. Here's a quick breakdown of the process:

5-Step LED Lighting Compliance Audit Process
Before diving into the audit process, it's crucial to establish clear objectives and pinpoint the relevant regulations. This initial step follows our proven process and lays the groundwork for everything that follows.
Start by defining the purpose of the audit. Is it aimed at cutting energy costs, improving safety, or aligning with specific sustainability targets? Collaborate with facility managers to ensure the objectives align with operational priorities. Rank these goals based on available budget and timelines. For example, industrial LED retrofits typically deliver 20–30% energy savings, making this range a practical benchmark to measure success.
Most facilities are subject to a mix of federal, state, and local standards. Key federal energy codes like ASHRAE 90.1 and the International Energy Conservation Code (IECC) set minimum lighting efficiency requirements. Meanwhile, the Illuminating Engineering Society (IES) offers recommendations for illuminance levels - measured in footcandles - tailored to different workspaces. These guidelines help identify areas that may be over-lit or under-lit. Stay alert to upcoming changes in regulations, particularly those involving lighting controls such as occupancy sensors and dimming systems. Additionally, verify state and local regulations with your jurisdiction to ensure full compliance before finalizing your checklist.
The next step is gathering baseline data to assess current performance. Start by reviewing 12–24 months of utility bills to calculate average annual lighting costs. Obtain digital floor plans or conduct walkthroughs to document the facility's layout. Track burn hours using sensors or by interviewing staff - high-bay fixtures, for instance, often run around 4,000 hours per year. Use spreadsheets to systematically organize operational hours, maintenance records, and feedback from occupants about problem areas. This preparation not only supports accurate energy calculations but also helps identify inefficiencies early in the process, even before setting foot on the shop floor.
Once your objectives are clearly defined, the next step is assembling the right tools and resources to ensure your audit is both accurate and efficient. Having a well-prepared toolkit not only streamlines the process but also enhances safety and precision during the audit.
To conduct a thorough lighting audit, you'll need a mix of measurement devices, safety gear, and documentation tools. Start with a light meter, which is essential for measuring footcandles - the standard unit of light intensity in the U.S. A color temperature meter is equally important, as it measures Kelvin levels, which can influence worker productivity and morale beyond just brightness levels. For spatial measurements, laser measures are ideal for large spaces like warehouses, while a standard tape measure works well for smaller office settings.
A smartphone or camera is invaluable for capturing visual evidence of fixture conditions, such as dust buildup, which can reduce light output by over 50%. Additionally, use audit forms or spreadsheets to log key data like wattage, ballast types, and fixture counts. For more complex facilities, consider photometric software like Visual Lighting, which allows you to simulate lighting scenarios and identify potential issues.
| Tool Category | Specific Equipment | Purpose in Audit |
|---|---|---|
| Measurement | Light Meter | Measuring footcandles/light intensity |
| Measurement | Color Temperature Meter | Measuring Kelvin levels for worker efficiency |
| Spatial | Laser/Tape Measure | Recording mounting heights and floor dimensions |
| Documentation | Smartphone/Camera | Capturing visual evidence of fixture conditions |
| Documentation | Audit Forms/Spreadsheets | Systematic data entry of wattage and quantities |
Once you've secured these tools, you're ready to move on to safety preparations and gathering essential documentation.
Safety is non-negotiable during any audit. Personal Protective Equipment (PPE) is a must, with specific requirements depending on the type of facility. For instance, industrial environments may require more specialized gear compared to retail or office spaces.
In addition to physical safety, proper documentation is crucial for a comprehensive audit. Collect building floor plans to outline the audit scope and maintenance logs to identify patterns of fixture burnout. You'll also need IES standards to compare current lighting levels with recommended benchmarks for specific tasks. Don’t forget to include local building codes and utility rebate criteria, which can help align your findings with potential financial incentives.
This level of preparation transforms your audit into a strategic evaluation, uncovering opportunities for energy savings - especially since lighting can account for 20% to 40% of energy consumption in commercial and industrial buildings.
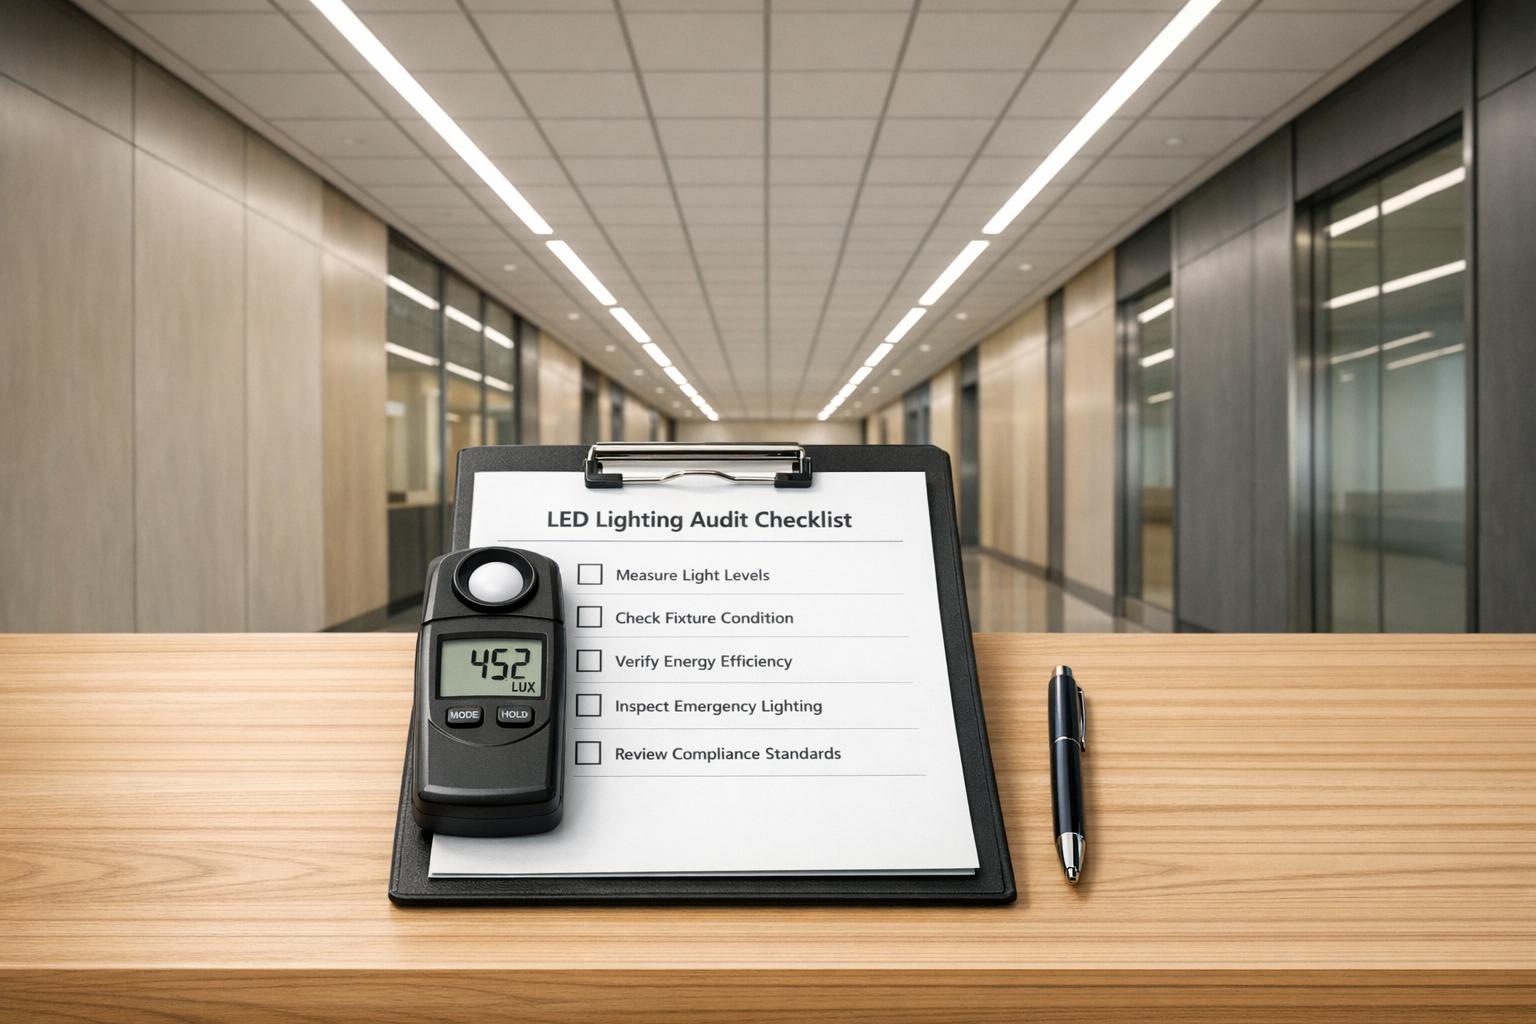
This is where your audit takes shape. A thorough walkthrough allows you to assess your facility's actual lighting conditions. By following a systematic approach, you can ensure no area is missed and all relevant details are captured.
Break your facility into zones - think offices, production floors, warehouses, outdoor spaces, or any specialized areas. Each zone has unique lighting needs, so auditing them separately helps address specific requirements. As you go, list out every lighting fixture, noting details like the type (LED, CFL, HID, fluorescent), wattage, and hours of operation. Don’t forget to account for exceptions, such as night shifts or outdoor lights that run from dusk till dawn.
"The most important data when conducting a lighting audit is the correct fixture count and the correct lamp and wattage types inside each fixture." - FSG
Measure footcandles at task height and record Kelvin levels in each zone to ensure light quality matches the tasks performed there. For instance, a warehouse might need cooler lighting than an office where employees spend long hours. Keep detailed notes and measurements to build a complete picture of your current setup.
Start by recording the number of fixtures, lamp types (e.g., T8, HID), lamps per fixture, ballast type, voltage, and mounting heights. Use your phone or a camera to take photos - both close-ups of individual fixtures and wide-angle shots of the area. This visual record can be invaluable later. Pay attention to physical conditions like dirt buildup, failed lamps, or damaged parts, as these can cut light output by over 50%.
For controls, note what’s in place: manual switches, occupancy sensors, daylight sensors, timers, or dimming systems. Also, look for anything that might block light distribution, such as high shelving, conveyors, or modular furniture. These details will help assess whether your lighting system meets the needs of each area.
| Data Category | Details |
|---|---|
| Fixture Details | Type (Troffer, High Bay, Strip), Quantity, Condition (Dusty, Damaged) |
| Lamp/Ballast | Lamp Type (T8, T12, HID), Wattage, Lamps per Fixture, Ballast Type |
| Controls | Manual Switch, Occupancy Sensor, Daylight Sensor, Dimming, Timers |
| Measurements | Footcandles at task height, Ceiling height, Mounting height, Kelvin temperature |
Once you’ve gathered your data, analyze it to uncover potential compliance issues. Look for trouble spots like insufficient lighting, outdated fixtures, or systems running continuously without automation. Areas that are too dim or too bright compared to IES standards can waste energy and create safety risks. Outdated technologies, such as fluorescent or halogen bulbs, may signal inefficiency and compliance concerns.
Check for safety hazards like dark spots or uneven brightness, which can reduce productivity or even lead to accidents. Use a color temperature meter to identify mismatched Kelvin levels, as these can impact focus and comfort. For tricky areas, photometric software (like Visual Lighting) can simulate lighting conditions and reveal problems not immediately visible during your walkthrough.
Now that you've gathered your data, it's time to analyze the energy performance of your lighting systems. This step helps you understand how much energy your lighting consumes, its annual cost, and where upgrades can deliver the most savings.
To calculate annual energy use, use this formula:
Annual kWh = (Watts per fixture × Number of fixtures × Hours of operation per year) / 1,000.
Once you have the annual kWh, multiply it by your utility rate to determine yearly costs.
Here’s an example: If your warehouse has 50 high-bay fixtures, each rated at 400 watts, operating 12 hours a day for 250 days a year, the calculation looks like this:
(400 × 50 × 12 × 250) / 1,000 = 60,000 kWh annually.
At a utility rate of $0.12 per kWh, that adds up to about $7,200 per year. Switching to modern LED fixtures, which can cut energy use by roughly 60%, would bring consumption down to 24,000 kWh - saving around $4,320 annually.
Look for zones with older, less efficient fixtures like fluorescent, CFL, or metal halide lights. These typically produce just 13–57 lumens per watt, compared to over 100 lumens per watt with quality LEDs. Facilities using older high-bay fixtures can consume 30–60% more energy than LED systems.
Also, note any fixtures that are dusty, damaged, or missing lamps. These issues can reduce efficiency by 10–20%.
Pay attention to areas lacking proper controls. For example:
These inefficiencies can waste significant energy. Documenting these gaps will help you identify easy fixes that improve efficiency without replacing every fixture.
Use your audit data to compare your current systems against benchmarks like ASHRAE 90.1 and IECC standards. Tools like power meters, light meters, and utility bills can help verify your findings. For industrial LED systems, aim for at least 100 lumens per watt - anything below that indicates an upgrade opportunity.
Rank problem areas by factors like energy waste, safety concerns, and compliance issues. A simple spreadsheet can help you prioritize upgrades. This organized approach not only strengthens your case for improvements but could also make your facility eligible for utility rebates or 179D tax deductions.
For expert guidance during your LED compliance audit, reach out to specialists like Luminate Lighting Group. They can help you navigate the process and maximize your savings potential.
Turn your energy data and identified inefficiencies into a focused, actionable plan. This step involves documenting findings, suggesting specific upgrades, and laying out a practical timeline for implementation. Below, you'll find guidance on presenting findings, recommending upgrades, and planning the rollout.
Using the data you've gathered, craft a clear and concise report that outlines current inefficiencies and areas for improvement. This report should be easy for stakeholders to understand and include critical details like current energy consumption, annual operating costs, and any compliance issues uncovered during the audit. Highlight how the facility measures up against standards like ASHRAE 90.1 or IECC, emphasizing areas that fall short.
Organize the findings by priority: address safety concerns first, then focus on significant energy waste, followed by other compliance issues. To help decision-makers see the value of your recommendations, include data-driven insights such as ROI projections, payback periods, and estimated cost savings. This approach helps stakeholders grasp both the financial and operational benefits of your proposed improvements.
When recommending LED upgrades, tailor your suggestions to the specific needs of each area. For example, high-bay spaces might require high-efficiency LED fixtures designed for those settings, while low-traffic zones could benefit from occupancy sensors. Outdoor lighting might be better managed with timers, and daylight sensors can optimize areas with natural light.
Don’t forget to explore financial incentives like utility rebates and 179D tax deductions. Research local energy efficiency programs and their requirements to help offset the initial investment. By including these opportunities in your recommendations, you can make the upgrades more appealing and cost-effective for stakeholders.
Develop a phased timeline that reduces disruptions to daily operations. Start with high-energy-use or high-traffic areas to achieve immediate results and demonstrate early wins. This phased approach also allows costs to be spread out over time. Be sure to consider any regulatory deadlines at the local, state, or federal levels, such as those set by the DOE, when planning your schedule.
Plan installations during off-hours or maintenance periods to avoid interfering with production. Early coordination with facility managers, electrical contractors, and utility providers is essential to ensure everyone understands their responsibilities and the timeline. Involve key stakeholders - like safety teams, financial departments, and facility managers - from the beginning to address operational, safety, and budgetary concerns. For more complex projects, consider working with specialists like Luminate Lighting Group. Their expertise can help you manage technical details, maximize rebates, and ensure compliance with all standards.
This structured five-step process offers a clear path to evaluate and improve facility lighting systems. It starts with defining your objectives and identifying relevant regulatory standards. Then, gather essential tools like light meters, digital laser measures, and proper documentation to ensure precise measurements. The third step involves a detailed walkthrough of your facility to inventory fixtures and measure illumination levels in footcandles at task height. Step four focuses on analyzing energy usage and pinpointing inefficiencies by comparing current performance to baseline standards. Finally, an action plan is developed, prioritizing recommendations with a practical timeline for implementation. This method not only ensures compliance but also helps achieve noticeable energy and cost savings.
A well-executed compliance audit offers tangible benefits across several areas. LED retrofits can cut energy use by 50% to 75% compared to older lighting systems. Plus, high-performance LED fixtures, often rated for up to 100,000 hours, significantly reduce long-term maintenance expenses. Beyond cutting costs, these upgrades improve workplace safety and create a better working environment. Additionally, LED compliance audits help facilities meet FCC Part 15 regulations, which limit radiated emissions. They can also open the door to utility rebates and tax incentives, providing even more financial advantages.
Facility managers can take decisive steps to maximize these benefits. Start by applying the five-step process to your facility. Use professional-grade tools like light meters instead of relying on visual judgments, and make sure to account for real burn hours, including those for cleaning crews, night shifts, and dusk-to-dawn exterior lighting, when calculating ROI. For larger or more complex facilities, partnering with certified lighting auditors can be a smart move. These professionals can help navigate building codes and uncover hidden inefficiencies. After installation, implement regular monitoring to track energy costs and system performance, ensuring your lighting setup remains efficient and safe. Staying proactive will help you maintain both cost savings and workplace safety over time.
To learn more about LED lighting compliance audits and retrofits, contact Luminate Lighting Group at https://luminatelightinggroup.com.
When it comes to lighting in your facility, several U.S. codes and standards might apply, primarily focusing on energy efficiency, safety, and accessibility. Some of the key regulations to be aware of include:
In addition to these, safety and accessibility are covered by OSHA (Occupational Safety and Health Administration) and the ADA (Americans with Disabilities Act), ensuring workplaces are both safe and accessible for all individuals.
Looking ahead to 2024, updates will bring stricter rules, such as reduced lighting power allowances and more advanced control system requirements. Staying compliant with these changes is essential to meet both legal standards and sustainability goals.
To keep tabs on crucial metrics, focus on tracking light levels (illuminance), energy consumption, and the condition of fixtures. Use tools like lux meters to ensure illuminance aligns with established standards and energy meters to monitor power usage accurately. Additionally, document the inventory and state of fixtures while verifying compliance with energy codes such as ASHRAE 90.1 and IECC. This information is essential for spotting inefficiencies, confirming system performance, and planning any required upgrades.
To calculate the ROI and determine rebate eligibility for LED lighting upgrades, you’ll need to evaluate several factors: project costs, energy savings, maintenance savings, and available incentives. Start by accounting for all expenses, including fixtures, labor, and materials. Then, compare your current energy consumption with the estimated usage of the proposed LED system.
Don’t overlook utility rebates and tax incentives like Section 179D, which can lower your overall costs significantly. To qualify, ensure you meet specific requirements, such as using ENERGY STAR or DLC-listed products, and submit all necessary documentation accurately. These steps can make a big difference in your final savings.


